- Overview
- Getting Started: Steps to Build Geofences and Geoframes in Foursquare
- Turnaround Time
- Implementation and Application
Overview
Below outlines the process for building a Foursquare Geofence or Geoframe (Foursquare refers to them as "proximities" and "audiences", respectively).
Note: For simple radius-based geofences, we can create these directly with our DSP partner at no additional CPM cost. To learn more about this reach out to your Account Manager (AM) or submit a ticket to our client support team. We will set up your radius geofence as soon as we receive the necessary information. For advanced geofences (which use custom polygon shapes) and for all geoframes follow the steps below.
Getting Started: Steps to Build Geofences and Geoframes in Foursquare
- If you need to access Foursquare please contact your Account Manager or Submit a Ticket to the client support team to request a registration email for setting up your Foursquare Self-Service account if you do not have one currently.
- Reference this article on Geofencing and Geoframing. It discusses use cases for the two tactics, best practices, and it includes a video on how to use Foursquare.
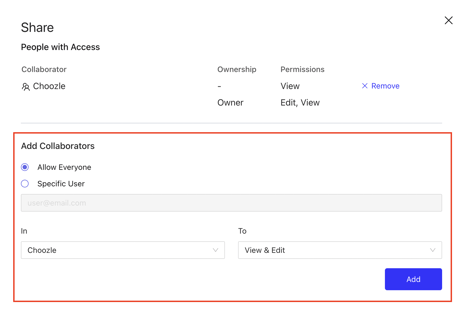
- Once finished creating the geofence/geoframe design, click the "share" button for the given design you would like to send to us, and select 'Choozle' and 'View & Edit' for the "In" and "To" drop downs. Once you are ready click 'Add' and the design will be shared with our team.

- Please file a support ticket in the customer support portal and fill out the required details after selecting Append Geofence to Campaign / Ad Group or Surface a Geoframe after a Foursquare Proximity (Geofence) or Audience (Geoframe) design has been shared with Choozle.
In your ticket, include the following details:
- Design name
- Design ID
- Specify the campaign(s) and ad group(s) where you’d like the geofence implemented (Geofences only).
Turnaround Time
Once the Client Support Team has access to the designs in Foursquare, they will begin building them out in Choozle. The standard turnaround time is typically 3–5 business days for the geofence or geoframe to populate in your account.
Implementation and Application
- Geofence (Proximity Build)
| Detail | Requirement |
| Implementation | The Client Support team will apply the geofence directly to the specified ad group(s) on the backend. |
| Platform View | This geofence will be applied by our team on the backend and will not appear directly within your Choozle platform interface. |
- Geoframe (Audience Build)
| Detail | Requirement |
| Implementation | The Client Support team will surface the geoframe segment to your account. |
| Platform View | You will find the audience under Partner Segments in the Audience Builder. |
| Activation Steps |
1. Add the surfaced segment to a Custom Audience. 2. Assign that Custom Audience to the appropriate ad group(s). |
Need Help?
If you have any additional questions please reach out via your Customer Support Portal!