GUIDE:
Getting Started
If you would like to deploy Choozle’s Smart Container Tag via Shopify, you will need to drop the Smart Container Tag into the Shopify code as well to ensure it's firing there, too.
Instructions How To Install Choozle SCT In Shopify
Here are two steps to take in order to get the conversion event firing on Shopify checkout page:
- Log into your Shopify ORG
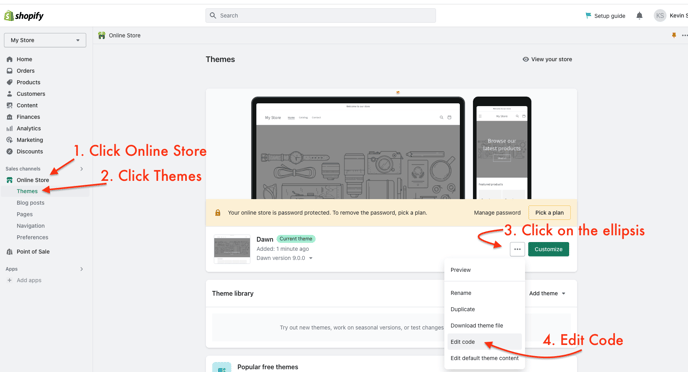
- On the left sidebar, click on the 'Online Store' then click 'Themes'
- Now that you're in 'Themes', click the on the ellipsis right next to the green 'Customize' button and hit 'Edit Code'
4. You will be redirected to page the page layout screen
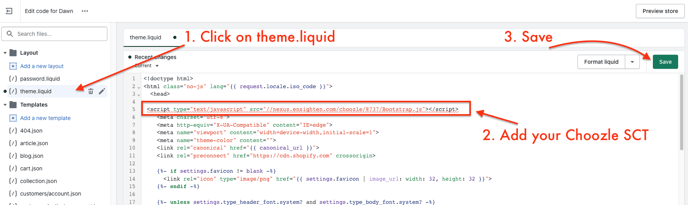
5. Under the 'Layout' folder, select the theme.liquid file and hit edit
6. Grab your accounts Smart Container Tag script from Choozle, under Audiences> 'Manage My Sites'
7. Go back into Shopify and paste it right under the opening <head> tag.
8. Hit Save
 9. Congrats! Now the Choozle Smart Container Tag is place on your websites root URL and will fire across all pages.
Enabling Dynamic Passback Conversions on Shopify Checkout Page
In addition to firing a standard conversion or retargeting event on the thank you / order confirmation page, Choozle also allows you to place a dynamic conversion pixel on this page to pass back dynamic conversion information (like revenue value and order ID).
Instructions How to Install A Dynamic Pixel In Shopify
1.) Once you've set up your checkout confirmation conversion event in campaign settings, submit a ticket via the Support Center requesting a Shopify dynamic passback pixel associated with that conversion event.
- Next, because the Shopify checkout process is hosted on Shopify and not on your own site, you'll need to drop the dynamic pixel script into the Additional Scripts field of the Checkout settings within your Shopify settings:
From the Shopify Admin view, select Settings in the bottom left corner.
Next, select Checkout.
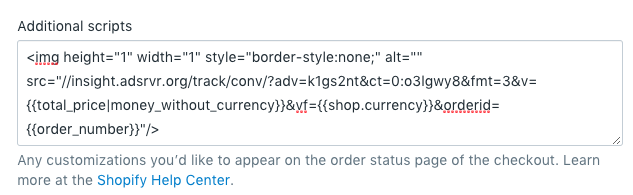
3. Scroll down to the Order Status Page section and in the field labeled Additional Scripts, copy and place your dynamic pixel script into this field
4. You'll be provided with an image pixel pre-appended with Shopify's standard passback macros that looks like this:
<img height="1" width="1" style="border-style:none;" alt="" src="//insight.adsrvr.org/track/conv/?adv=k1gs2nt&ct=0:o3lgwy8&fmt=3&v={{total_price|money_without_currency}}&vf={{shop.currency}}&orderid={{order_number}}"/>
NOTE:
To ensure that your pixels correctly track all conversion events, set up tracking scripts on both the post-purchase page and the order status page. To avoid counting conversion events twice, you can use the post_purchase_page_accessed Liquid variable in scripts that run on the order status page.
If a customer lands on the post-purchase page and then navigates to the order status page, then the post_purchase_page_accessed variable returns true. If a customer doesn't arrive at the post-purchase page, then the variable returns false.For example, you can use the following format for your scripts on the order status page:
<script>
// ***insert your tracking script here***//
</script>
{% endif %}
5. Hit Save
6. You're all done! Now in your standard Choozle reporting, you will be able to see the revenue value associated with each checkout. You may also request scheduled Conversion Detail reports, which will include order number in addition to revenue value.
Enabling Dynamic Passback Conversions on Shopify Checkout Page
In addition to firing a standard conversion or retargeting event on the thank you / order confirmation page, Choozle also allows you to place a dynamic conversion pixel on this page to pass back dynamic conversion information (like revenue value and order ID).
Example Passback Tag Using Shopify’s Default Parameter
 Shopify Instructions:
1.) Once you've set up your checkout confirmation conversion event in campaign settings, submit a ticket via the Support Center requesting a Shopify dynamic passback pixel associated with that conversion event.
2.) You'll be provided with an image pixel pre-appended with Shopify's standard passback macros that looks like this:
<img height="1" width="1" style="border-style:none;" alt="" src="https://insight.adsrvr.org/track/pxl/?adv=c710nh5&ct=0:actda6g&fmt=3&v=&vf=&orderid="/>
- From your Shopify admin, go to Settings > Checkout.
-
Under Order status page, go to the Additional scripts text box.
-
Paste the following code above into the Additional scripts box:
3.) Follow the steps above to navigate to the Additional Scripts field of the Checkout settings within your Shopify settings and place the dynamic passback pixel into this field.

4.) Now in your standard Choozle reporting, you will be able to see the revenue value associated with each checkout. You may also request scheduled Conversion Detail reports, which will include order number in addition to revenue value.
It is common to include scripts that track sales conversions on the order status page because it is the final page of checkout. However, customers who return to check their order status might count as a second sale in your analytics. See Shopify's Knowledge Base for more info.
To prevent your analytics from counting customers more than once, you can add the first_time_accessed property around some or all of your additional scripts. To do this, use a Liquid if statement, and place any scripts that you only want to run once between tags.
2.Under Order status page, go to the Additional scripts text box.
3. Paste the following code into the Additional scripts box:
// Scripts you want to run on every visit
4. If you want a script to run the first time that the order status page is accessed, then paste it between the tags. If you want a script to run every time the order status page is accessed, then paste it below the tag.
5. Click Save.
If you need additional Shopify assistance, please reference the Shopify tracking pixel documentation here. ***These rules apply to Shopify+ accounts as well.***