Adding UTMs to Choozle Campaigns
Adding UTMS to Creatives
- After you’ve decided where you will drive the traffic from your campaign creative assets and you’ve decided on all relevant components of the actual UTM tag, you are ready to attach those tags to individual creative assets within the “Creative Assets” tab within the Libraries dropdown in Choozle.

- After you click on the “Creative Assets” option from the dropdown, you will be brought to the page where ALL of the creative assets you plan to leverage should live.

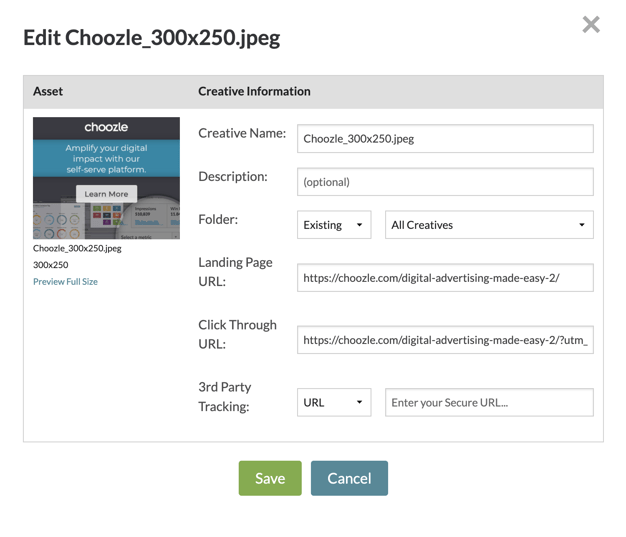
- Once you reach the Creative Assets page, click on the name of the creative asset in the first column that you plan to add a UTM tag to. Upon clicking the creative asset name, you will be brought to the following view:

- As you can see in the above screenshot, there are two different URLs in this view: the Landing Page URL and the Click-Through URL.
-
The Landing Page URL should be the destination where you want to send users who click on your ad, without any UTM parameters.
- The Click-Through URL is where you will place the full URL that includes your UTM parameters. All UTM codes should be added to the Click-Through URL in Choozle, not in the “Third Party Tracking” field.
-
NOTE: To keep your creative assets organized, we recommend using clear and consistent naming conventions and duplicating assets when they are used across multiple placements. For example, if you are using the same video for both CTV and OLV, you can name the files “Choozle_Final_CTV_15” and “Choozle_Final_OLV_15” and create separate assets for each. This makes it easy to identify and manage assets across channels and also allows you to apply unique UTM tags to each version so you can more accurately evaluate performance by source and placement, rather than only by creative.
Enhancing UTM Tracking Through Creative Asset Organization in Choozle
Choozle’s Creative Asset library and setup allow the same creative to be used across multiple ad groups, streamlining campaign setup. However, this can limit the level of detail available in UTM tracking and make it more challenging to accurately analyze website behavior for different targeting tactics.
For best results, assign a single creative to each ad group, allowing you to tailor UTMs with specific ad group details. To accomplish this, upload and rename each creative to correspond with its respective ad group.
Example Current Setup
In this example, the same ad is used in several ad groups:
-
Ad file: 320x50_self-serve-v1.jpg
Applied to:
-
Media Buyers (ad group)
-
Business Decision Makers (ad group)
-
Site Retargeting (ad group)
-
Because this one ad is reused, the same landing page URL and UTM string are applied across all three ad groups. That means website engagement data is grouped together and it is harder to see which ad group is driving the most value.
Example Recommended Structure
To get more granular insight, you can set it up so that each ad group has its own version of the ad and its own UTM parameters.
-
Rename and upload separate ad versions
-
For each ad group, upload a copy of the ad and include the ad group name in the file name.
-
Example file names:
-
320x50_self-serve-v1_media-buyers
-
320x50_self-serve-v1_business-decision-makers
-
320x50_self-serve-v1_retargeting
-
-
You would follow this same pattern for all other creative sizes.
-
-
Attach each ad to its matching ad group
-
In this example:
-
Ads with media-buyers in the name are only attached to the Media Buyers ad group
-
Ads with business-decision-makers in the name are only attached to the Business Decision Makers ad group
-
Ads with retargeting in the name are only attached to the Site Retargeting ad group
-
-
Now each ad version is unique to a single ad group.
-
-
Add UTM parameters for ad group and ad level tracking
-
To add in an additional UTM parameter so you can track website engagement by ad group/targeting tactic:
-
Add "term" field: this will be the ad group name
-
Add "content" field: this will be the ad name
-
-
Need Help?
If you have any additional questions please reach out via your Customer Support Portal!